Whether you’re a seasoned angler or a beginner, capturing a perfect photo of your prized trout catch is a moment to cherish. However, holding trout for a picture requires more than just a quick grip. Improper handling can harm the fish, particularly if you plan to release it. This guide will walk you through the essential steps to hold trout for a picture safely, ensuring that you get that Instagram-worthy shot while keeping the fish healthy.
1. Wet Your Hands First
Before touching the trout, always wet your hands. Trout have a protective slime coating that helps them resist parasites and infections. Dry hands can remove this layer, making the fish vulnerable. Wet hands minimize this damage and help keep the fish in good condition.
2. Support the Fish Properly
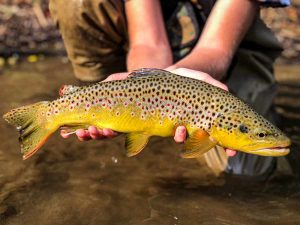
Trout are delicate creatures, and improper handling can cause internal injuries. When holding a trout, use both hands—one under the belly just behind the gills and the other supporting the tail. This two-handed grip provides full support to the fish’s body, reducing the risk of harm.
3. Avoid Squeezing the Fish
It’s natural to want to secure a firm grip on a slippery fish, but squeezing too hard can be fatal for trout. A gentle yet secure hold is sufficient. If the fish is too active, consider holding it partially in the water to calm it down before lifting it for a picture.
4. Keep the Fish Close to the Water
Whenever possible, hold the trout close to the water’s surface. This allows for a quick release if the fish starts to struggle. Additionally, it shows respect for the fish’s natural environment in your photo.
5. Angle the Fish for the Best Shot
For a picture that truly showcases your catch, angle the fish slightly toward the camera. This not only highlights the trout’s size but also captures its vibrant colors. Make sure the fish’s head and body are fully visible, and avoid tilting it too much, as this can strain the fish.
6. Mind the Sunlight
Lighting is crucial for a good photo. Position the fish so that natural light illuminates its scales without creating harsh shadows. Early morning or late afternoon offers the best light conditions for outdoor photography, giving your trout a stunning, glossy look.
7. Be Quick
The less time the trout spends out of water, the better. Plan your shot in advance, and be ready with the camera. A few seconds out of water is the maximum time a trout should be held, particularly if it’s going to be released.
8. Release with Care
After snapping the picture, carefully release the trout back into the water. Hold it upright in the water and gently move it back and forth to encourage water flow through its gills until it swims away on its own. A healthy release ensures the trout will live to fight another day.
9. Use a Net When Necessary
If the trout is particularly large or strong, use a rubberized landing net to secure it before the photo. Rubber nets are less likely to damage the fish’s skin and slime coat compared to other materials. Make sure the net is wet, and lift the fish just enough to take the photo.
10. Practice Catch and Release Ethics
Finally, always consider the impact on the fish. If catch and release is the goal, prioritize the fish’s well-being over the perfect shot. This means minimizing handling time and avoiding excessive lifting out of the water. Ethical practices in fishing ensure healthy fish populations for future generations.
By following these steps, you can achieve stunning trout photos while respecting the fish and its environment. Remember, a quick and careful approach is key to ensuring the trout’s survival after the picture is taken. With these tips in mind, your next trout photo will be both picture-perfect and fish-friendly.
Image: Orvis