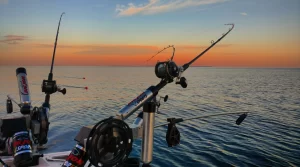
Trolling with a downrigger is a favorite tactic for targeting deep-water fish species in lakes, especially during peak seasons when fish move to cooler, lower depths. A well-set downrigger system can revolutionize your lake trolling experience, allowing for precision in depth targeting and improved catch rates. This guide will help anglers achieve the perfect downrigger setup to maximize results on the water.
Understanding the Role of Downriggers in Lake Trolling
A downrigger is a device that controls a bait’s depth when trolling, ideal for reaching fish in varying depths. By utilizing a weighted ball connected to a cable and a release clip, anglers can position baits at specific depths where fish are more likely to strike. This is especially useful in the summer and fall seasons when species like trout and salmon seek cooler, deeper waters.

Essential Components for a Reliable Downrigger Setup
To start with an efficient downrigger setup, understanding the key components is crucial:
- Downrigger Weight (Cannonball): Generally weighing between 8 and 12 pounds, the cannonball ensures that the line remains at a set depth, even when the boat is moving. Select a weight that matches your trolling depth and speed to maintain stability.
- Downrigger Cable: Often made from stainless steel, this cable connects the weight to the downrigger. Some anglers prefer braided cables for their durability and reduced water resistance.
- Release Clip: Attached to the cable, this clip holds the fishing line and releases it when a fish bites. Experimenting with clip tension helps reduce false releases and missed catches.
- Downrigger Rod and Reel: Choose a rod and reel designed for trolling, with enough backbone to withstand the tension from the downrigger weight and the force of potential catches.
- Fish Finder Compatibility: A quality fish finder can greatly enhance a downrigger’s effectiveness, helping identify ideal trolling depths based on fish location and water temperature.
Step-by-Step Downrigger Setup for Effective Trolling
- Attach the Cannonball to the Cable: Secure the weight to the downrigger cable. A reliable connection is essential, as any looseness could lead to issues when lowering to depth.
- Connect the Line to the Release Clip: After casting your bait, clip the fishing line to the release clip attached to the cable. Adjusting the clip’s tension can prevent accidental releases, especially when trolling at varying speeds.
- Set the Depth: Use the downrigger to lower the weight to the desired depth based on your target fish species and lake conditions. A fish finder can be invaluable for setting an accurate depth.
- Adjust Trolling Speed: Control the boat’s speed to suit the fish species and water conditions. Trout, for instance, often respond to slower trolling speeds, while species like pike may prefer faster movement.
Tips for Lake Trolling Success with a Downrigger
- Monitor Bait Movement: A quality fish finder can reveal how fish react to your bait, enabling on-the-fly adjustments to trolling speed and depth.
- Consider Seasonal Patterns: Fish species’ depth preferences change with seasons, so adjust downrigger settings accordingly.
- Experiment with Lures: Downriggers allow for experimenting with a range of lures. For example, deep-diving crankbaits and spoons perform well in deeper waters.
Elevate Lake Trolling with a Perfect Downrigger Setup
With a proper downrigger setup, anglers can unlock new trolling depths and expand their catch range on lakes. Each component plays a vital role, and adjustments based on season and fish behavior can make all the difference. For those seeking precision in lake trolling, a downrigger is the go-to solution.
Image: bigjon


