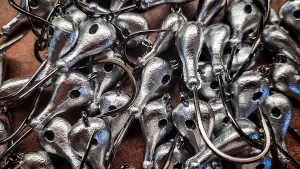
The off-season has arrived, bringing cold temperatures and frozen lakes. For many bass anglers, these months can feel like an eternity. However, one activity offers both a productive way to pass the time and valuable preparation for the next fishing season: pouring and crafting custom jigs.
Caleb Kuphall’s Expertise BASS Elite Series Pro Caleb Kuphall has over two decades of experience in jig-making. His homemade flipping jigs have proven their effectiveness on numerous occasions, providing an edge in the competitive fishing world.
Kuphall emphasizes the rewarding nature of crafting jigs. Anglers often find the first bass caught on a self-made jig to be an unforgettable experience. Although the idea of starting from scratch can feel overwhelming, Kuphall assures it is both simple and cost-effective.
“Don’t let it scare you,” Kuphall advises. “It’s not rocket science, and anyone can do it.”
Beyond cost savings, homemade jigs allow anglers to customize their lures, adding unique touches that can increase confidence and effectiveness in the water.

Essential Supplies for Jig-Making To start crafting jigs this winter, assemble the following tools and materials:
- Lead melting pot
- Lead
- Hook (matched to the jig mold’s style and size recommendations)
- Do-It Molds
- Pro-Tec Powder Paint
- Oven (a toaster oven works well)
- Fiber weed guards
- Five-minute clear epoxy
- Vise
- Skirt material
- Thread and bobbin holder or rubber skirt bands
Safety First Safety is paramount when pouring jigs. Always wear heat-resistant gloves and eye protection, and work in a well-ventilated area, such as a garage or open room with a fan to disperse fumes.
Step-by-Step Jig-Making Process Kuphall’s preferred jig for versatility is the Do-It Mold Sparky Jig, available in various sizes and compatible with 3/0 to 5/0 hooks. He recommends the Gamakatsu 294 hook in a 4/0 size. Follow these steps to create a Sparky Jig:
- Heat and Pour Melt the lead in the pot and pour it into the jig mold. Allow it to cool briefly before removing it.
- Deburr Trim excess lead and smooth any burs for a clean finish.
- Apply Powder Paint Heat the jigs in a 350°F oven for five minutes. Dip them into powder paint, ensuring an even coat.
- Heat Again Place painted jigs back in the oven for about a minute. Use a wire to clear paint from the hook eye while still warm.
- Cure Cure the paint by baking the jigs for 15 minutes. This ensures durability.
- Add Weed Guard Clear the weed guard hole with a 1/8-inch drill bit. Insert the weed guard and secure it with epoxy.
- Attach Skirt Secure the jig in a vise and tie the skirt material. Start with the top strands to prevent flaring, then add the bottom strands.
- Secure and Trim Tie six overhand knots to secure the skirt, apply fly-tying cement, and let it dry. Trim the skirt and weed guard to the desired length.
Tips for Success Learning to work with an oven is essential for achieving consistent results. Variations in oven temperature, altitude, and humidity can affect paint adhesion. Testing and adjustments may be needed to perfect the process.
For those struggling with powder adhesion, a blow torch can heat the jig before painting. However, using an oven is often faster and more consistent.
Skirt Tying for Enhanced Action Custom skirts are a crucial part of jig-making. Hand-tied skirts offer superior action compared to pre-made options. Kuphall recommends experimenting with different materials and colors to achieve the desired effect.
“By making your jig, the sky is the limit,” Kuphall says. Customization allows anglers to match their jigs perfectly to the conditions and target species, giving them a distinct advantage.
Whether creating a full-bodied profile or trimming for finesse, personalizing jigs ensures they stand out in the water. With practice and experimentation, anglers can develop a signature style that enhances their fishing experience.
Image/Source: Wired2Fish


