For any angler, transforming a fresh-caught bass into a delectable meal is a rewarding experience. Mastering the boneless filleting technique elevates this process, yielding fillets that are perfect for frying or grilling. This guide provides a comprehensive, step-by-step approach to achieving professional-quality, boneless bass fillets.
Essential Tools:
- Sharp Fillet Knife: A high-quality, sharp fillet knife with a sturdy, non-slip handle is crucial.
- Filleting Glove: Especially for beginners, a filleting glove protects against accidental cuts.
- Cutting Board: A cutting board with a fish clip ensures stability during filleting.
- Rinsing Water: Access to clean water, whether from a hose, tap, or stream, is necessary for rinsing the fillets.
Boneless Filleting Technique:
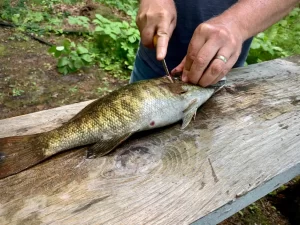
- Initial Cut: Place the bass on the cutting board, head secured. Make a cut from above the gill plate, down and back, behind the pectoral fin, stopping at the backbone.
- Top Fillet Cut: With the knife on the same side of the backbone, insert it an inch into the fish’s top, perpendicular to the initial cut. Slice towards the tail, down to the rib cage, but not through it.
- Through Cut: Once past the rib cage, cut through the fish to the tail.
- Separation: Use the knife to separate the fillet from the backbone.
- Scaling (Optional): If skin-on fillets are desired, remove scales with a spoon or butter knife.
- Skin Removal (Optional): For skinless fillets, place the fillet skin-down, hold the tail, and slide the knife between the meat and skin, separating them.
Proper filleting is the first step toward a delicious bass meal. By following these instructions, anglers can consistently produce boneless fillets ready for culinary exploration.
Ready to transform your catch into a culinary masterpiece? Practice these filleting techniques and share your delicious bass creations! Let your angling adventures extend from the water to the dinner table.
Image/Source: WOS