For those willing to embrace the learning curve, fly-tying can become a rewarding pastime. Crafting flies using fur, feathers, and personal techniques brings a satisfying sense of accomplishment. Watching a trout aggressively strike a handmade fly only enhances the experience. And when the snow falls and outdoor options are limited, why not enjoy time at the tying bench instead of baking cookies?

Get the Basics Down
Like golf or archery, fly-tying requires practice. Starting with large hooks allows movements to become more precise. Many anglers benefit from watching instructional videos or taking a class. Since no competitive fly-tying circuit exists, the focus remains on enjoying the process. The satisfaction of catching fish with self-tied flies often outweighs any imperfections.
A simple nymph may be an ideal first fly, but experimenting with a dry fly can be just as enjoyable. A basic dry fly serves as a versatile pattern, resembling various insects. Plus, the visual appeal of a dry fly floating on the water makes the effort worthwhile.
Ensure adequate lighting and consider adding a desk lamp to the workspace. A bit of patience, a steady hand, and perhaps a sip of Scotch create the perfect setup for a successful fly-tying session.
Step-by-Step Guide to Tying a Basic Dry Fly
Step 1: Secure the hook in the vise. Hold the thread to the hook with the off-hand index finger and wrap it down to the bend, covering the tag end. Trim any excess.
Step 2: Allow the bobbin to hang, maintaining tension on the thread. Form a small, teased-out wad of dubbing, about the size of a dime.
Step 3: Twist the dubbing around the hanging thread to create a tight, yarn-like strand. Evenly wrap it around the hook to form the body. Remove excess dubbing if needed and secure the thread.
Step 4: For the wing, cut a small bundle of deer hair, about half the width of a pencil. Remove fine hairs from the base and place the tips into a hair stacker to align them.
Step 5: Remove the hair from the stacker and measure it against the hook. The tips should extend to the hook bend. Place the hair on top of the hook, with the butt ends near the eye.
Step 6: Make a few gentle wraps around the hair to secure it, followed by a few tighter wraps. Keep the hair on top of the hook, allowing it to flare slightly. Trim the butt ends close to the hook.
Step 7: Wrap the thread to cover the trimmed hair ends, forming a tapered head. Finish with a whip finish, tying off the thread securely. Apply a drop of head cement for durability.
Step 8: Step back, admire the handiwork, and raise a glass in celebration. Soon, that hand-tied creation may entice a hungry trout to the surface.
Essential Fly-Tying Tools
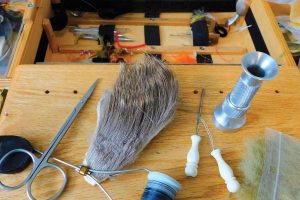
Starting a fly-tying hobby requires a few essential tools:
-
Vise to secure the hook.
-
Sharp scissors for precision trimming.
-
Hair stacker to align deer hair tips.
-
Head cement to secure the final knot.
-
Bobbin to hold and control the thread.
-
Bodkin (needle) for fine detail work.
-
Hackle pliers for handling feathers.
-
Materials including threads, feathers, hides, and synthetic yarns.
Ready to elevate the fishing game this spring? Gather the tools, follow these simple steps, and start crafting flies that attract even the most elusive trout. Dive into the fly-tying journey today and enjoy the satisfaction of fishing with hand-tied flies. For more fly-tying tips, techniques, and expert advice, explore additional resources and step-by-step guides. Let the creativity flow and get ready for an unforgettable season on the water.
Image/Source: gameandfishmag


