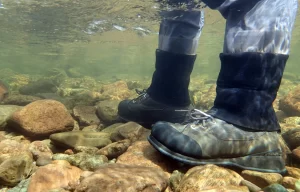
Wading boots are essential for anglers, offering support and grip when navigating slippery rocks and swift currents. However, over time, the soles of these boots can wear down, reducing their effectiveness and potentially causing dangerous slips. Instead of purchasing a new pair, many anglers opt to resurface their wading boot soles to restore traction and prolong their boots’ life. This guide will walk through how to resurface your wading boot soles, giving you the confidence to maintain your gear and stay safe on the water.
1. Why Resurface Wading Boot Soles?
Wading boots endure constant wear and tear from exposure to rough terrain, water, and mud. Over time, even the best soles can lose their grip, making fishing trips more hazardous. Resurfacing the soles can save money and keep a trusted pair of boots functioning effectively. Additionally, many anglers prefer to modify their soles to suit specific fishing environments, such as switching to felt for slippery, moss-covered rocks or rubber for rugged, uneven terrain.
2. What You’ll Need for the Job
To resurface your wading boot soles, gather the following materials:
- Replacement soles (felt, rubber, or studded options depending on preference)
- Strong adhesive (Shoe Goo, urethane adhesive, or other waterproof options)
- Sandpaper or a wire brush
- Utility knife
- Heavy-duty clamps or weights
- Cleaning supplies (water, mild detergent, and a cloth)
3. Step-by-Step Process to Resurface Wading Boot Soles
Step 1: Remove the Old Soles
Begin by thoroughly cleaning the soles of your boots to remove any dirt or debris. If the current soles are coming loose or peeling, use a utility knife or scraper to remove them completely. Be cautious to avoid damaging the boot’s midsole while scraping away the old material.
Step 2: Sand Down the Surface
Once the soles are removed, use sandpaper or a wire brush to roughen the surface where the new soles will be attached. This will help the adhesive bond more effectively with the boot. Ensure the area is even and free from any leftover adhesive from the old soles.
Step 3: Clean the Boots
After sanding, clean the soles of the boots thoroughly with water and a mild detergent. Ensure that the surface is completely dry before proceeding to the next step.
Step 4: Apply the Adhesive
Using a strong, waterproof adhesive (like Shoe Goo or urethane-based adhesives), apply a generous layer to the soles of the boots. Be sure to evenly distribute the adhesive over the entire surface to prevent any gaps or weak spots.
Step 5: Attach the New Soles
Place the new replacement soles (felt, rubber, or studded) onto the boot. Align them carefully so that they fit perfectly on the boot’s sole. Press down firmly, ensuring the new soles make full contact with the adhesive.
Step 6: Clamp or Weigh Down
Once the new soles are in place, use heavy-duty clamps or weights to press them down firmly against the boot. Allow the adhesive to cure according to the manufacturer’s instructions, which may take several hours or overnight.
Step 7: Trim Excess Sole
Once the adhesive has fully cured, use a utility knife to trim away any excess material from the replacement soles. Be sure to make clean, smooth cuts to avoid creating rough edges.
Step 8: Test the Boots
After the soles are securely attached, it’s important to test the boots in a controlled environment, such as a shallow stream or wet terrain, to ensure that the new soles provide the traction needed for safe fishing.
4. Choosing the Right Replacement Soles
There are various options available for replacement soles, and the choice depends largely on the type of fishing and the environment:
- Felt Soles: Ideal for slippery riverbeds, especially those covered in algae or moss. They provide excellent traction but can be less durable over rough terrain.
- Rubber Soles: More durable and versatile, rubber soles are best suited for rocky, uneven terrain. They offer better grip on dry surfaces than felt.
- Studded Soles: For anglers navigating extremely rugged environments, studded soles (either rubber or felt) provide additional grip on slick or uneven surfaces.
5. Tips for Prolonging the Life of Your Resurfaced Soles
- Rinse after use: After each fishing trip, rinse your wading boots with clean water to remove dirt, sand, and other debris that can wear down the soles.
- Dry thoroughly: Ensure your boots are completely dry before storing them to prevent mold or mildew from forming, which can weaken the adhesive.
- Inspect regularly: Check your soles regularly for signs of wear and address any issues early to prevent accidents.
Resurfacing the soles of your wading boots is a cost-effective way to maintain their functionality and keep you safe on the water. Whether you prefer felt for river fishing or rubber for hiking to remote spots, resurfacing can be customized to your specific needs. By following these steps, your boots will be ready for your next fishing adventure without breaking the bank.
Image: KirksFlyShop