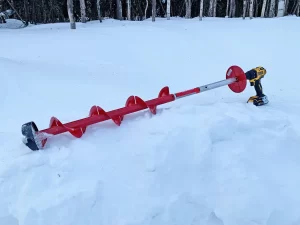
Ice fishing has become more accessible and enjoyable with the help of modern tools, and electric ice augers are leading the charge in convenience. However, high-quality electric augers can be expensive. For those seeking a cost-effective alternative, building a DIY electric ice auger using a cordless drill is an excellent solution. This guide will take you through the steps to create your own electric auger, offering a budget-friendly way to improve your ice fishing experience.
Why Choose a DIY Electric Ice Auger?
Electric ice augers are prized for their quiet operation, ease of use, and reduced manual effort compared to hand augers. While professional models come with hefty price tags, a DIY version using a cordless drill can be assembled for a fraction of the cost. This setup works well for recreational anglers who don’t need to drill dozens of holes in thick ice but still want the convenience of powered drilling.

What You’ll Need
Here’s a list of materials and tools required to build your DIY electric ice auger:
- Cordless Drill (18V or higher) – A powerful drill with high torque is essential for cutting through ice effectively.
- Ice Auger Drill Bit Attachment – You can purchase an auger bit designed for use with a cordless drill.
- Auger Adapter with Safety Plate – This adapter connects the drill to the auger bit and prevents the auger from slipping through the ice if it detaches.
- Drill Handle or Clam Plate – A handle attachment improves control and stability while drilling.
- Extra Battery Pack – Cold weather can drain batteries quickly, so having a spare is crucial.
Step-by-Step Assembly
- Attach the Auger Adapter
Begin by connecting the auger bit to the adapter. Ensure the connection is tight to prevent wobbling during drilling. - Secure the Drill
Attach the cordless drill to the adapter. Many anglers prefer using a clam plate or a side handle for added control and safety. The clam plate provides a solid grip and makes it easier to drill multiple holes without fatigue. - Check the Safety Plate
Make sure the safety plate is properly installed. This crucial component prevents the auger from dropping through the hole if the drill becomes detached. - Test the Setup
Before heading out onto the ice, test your DIY electric auger on soft ground or in shallow ice to ensure everything is working correctly.
Pro Tips for Optimal Performance
- Use Lithium-Ion Batteries: These batteries perform better in cold conditions compared to standard ones. Keeping them warm in an insulated bag helps maintain their charge.
- Don’t Force the Auger: Let the drill’s torque do the work. Applying too much pressure can damage the drill or the auger bit.
- Monitor Battery Life: Always carry fully charged spare batteries. A good rule of thumb is to swap them out before they drop below 30% to maintain drilling power.
Benefits of a DIY Electric Auger
- Cost Savings: Building your own electric ice auger can cost half as much as buying a commercial model.
- Portability: DIY augers are lightweight and easy to carry, making them perfect for mobile anglers.
- Customization: You can choose specific components based on your preferences and needs.
By creating your own electric ice auger, you’ll have a reliable, efficient tool that enhances your ice fishing experience without breaking the bank.
Image: OutdoorLife


